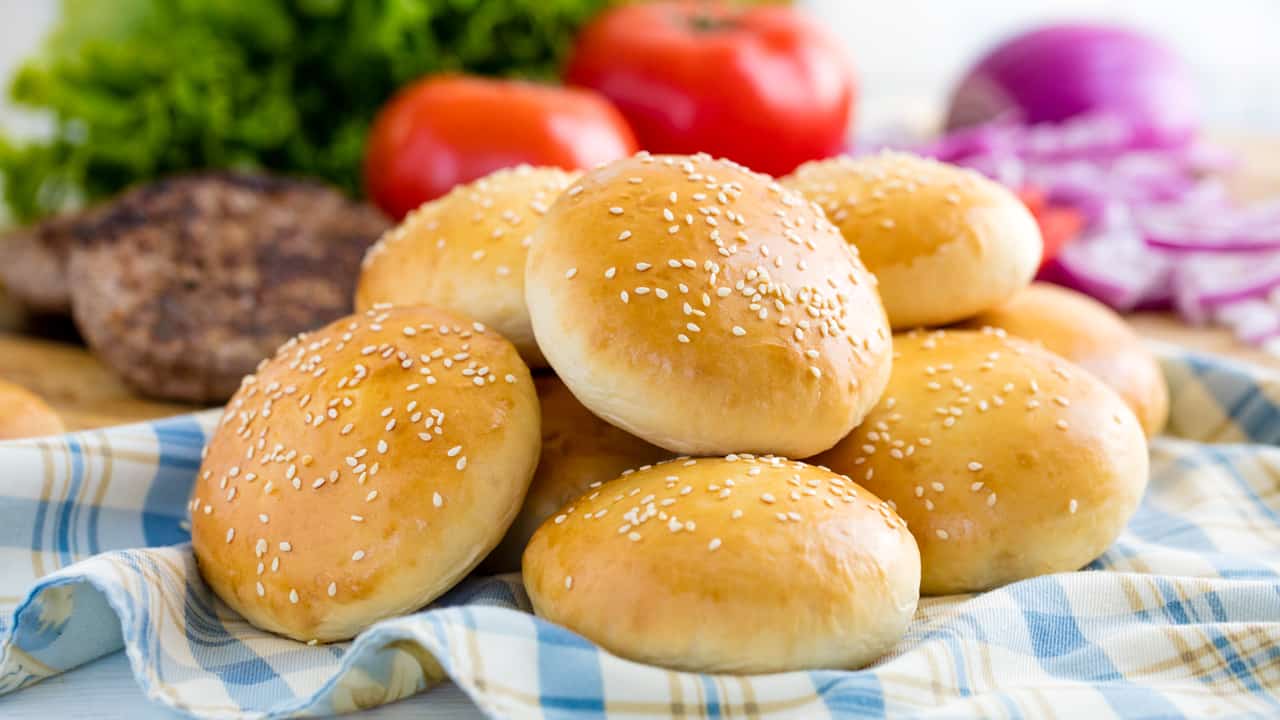
Unlock the Secret to Perfect Homemade Hamburger Buns in Just 1 Hour: Yeast to Oven!
Imagine biting into a juicy burger, cradled by a bun that’s pillowy soft yet perfectly robust, holding its shape without disintegrating into a sad, squishy mess. Now imagine achieving that perfection in just about an hour, from the moment your yeast awakens to the golden buns emerging from your oven. Sounds like a dream? It's not! This comprehensive guide will show you how to bake incredible homemade hamburger buns that will redefine your burger experience forever. Say goodbye to flavorless, store-bought mediocrity and hello to fresh, fragrant, and utterly delicious homemade goodness.
Why Homemade Hamburger Buns Reign Supreme
For too long, we've settled for the standard supermarket burger bun – often bland, sometimes dry, and almost always prone to crumbling under the weight of a well-dressed burger. Then there's the brioche bun trend; while undeniably rich, it can often be too sweet and so soft that it quickly succumbs to burger juices, transforming into a flimsy, compressed disc. If you, like us, prefer your bun to be a supportive partner rather than a sugary sponge, then baking your own homemade hamburger buns is the ultimate solution.
Our ideal bun strikes the perfect balance: a delightful pillowy softness that yields with each bite, yet possesses enough structure to retain its form and integrity, ensuring your burger doesn't become a handheld salad. You control the sweetness, the texture, and the quality of ingredients, resulting in a bun that not only tastes superior but also enhances the entire burger experience. There’s a distinct satisfaction that comes from serving a burger nestled in a bun you crafted yourself, a difference you can taste with every bite. To truly understand the revolution, delve into Homemade Hamburger Buns: Soft, Delicious, and Never Squishy, and you'll quickly discover why you'll never look back. For those who are ready to ditch the blandness, Easy Homemade Burger Buns: Forget Flavorless Store-Bought offers a compelling argument for homemade excellence.
The 1-Hour Homemade Hamburger Buns Blueprint: Yeast to Oven
The promise of "1 Hour: Yeast to Oven" might seem ambitious, given that traditional bread making often involves lengthy proofing times. However, with the right techniques, warm conditions, and active yeast, it's entirely achievable to accelerate the process, making incredible homemade hamburger buns accessible even on a busy weeknight. This timeframe focuses on the active yeast-driven steps, from mixing your dough to sliding your perfectly proofed buns into the oven. Here's a quick overview of how we achieve this speedy transformation:
- Rapid Dough Preparation (5-10 minutes): The first step is to combine your flour, yeast, warm milk, a touch of sugar (for yeast activation and a hint of flavor), butter, and salt. While hand kneading is an option, using a stand mixer with a dough hook is highly recommended to significantly reduce hands-on time to mere minutes, developing the gluten quickly for an elastic, smooth dough.
- First Accelerated Rise (20-30 minutes): This is where speed comes into play. Instead of a leisurely hour-long rise, we'll create an optimal environment for rapid yeast activity. Place your covered dough in a warm, draft-free spot – perhaps a slightly warmed oven (turned off, with just the light on), or a microwave with a cup of hot water alongside. The goal is for the dough to visibly double in size. Focus on the visual cue, not just the clock.
- Punch, Divide & Shape (10-15 minutes): Gently "punch down" the risen dough to release the gases. Divide it into equal portions (a kitchen scale ensures uniformity). Now comes the shaping trick: don't roll between your palms. Instead, cup each piece of dough with one hand on a clean, un-floured surface, gently rotating it in small circles to create surface tension and a smooth, taut ball. Then, gently flatten each ball with your palm to create the classic bun shape.
- Second Quick Proof (15-20 minutes): Arrange your shaped buns on a baking sheet, cover them loosely, and return them to your warm proofing environment. During this time, the buns will puff up beautifully, doubling in size once more. Simultaneously, preheat your oven to the specified temperature so it's ready when the buns are.
- Egg Wash, Sesame & Bake (12-15 minutes): Once perfectly proofed, gently brush the buns with an egg wash for a beautiful golden crust and sprinkle with sesame seeds (or your topping of choice). Bake until gloriously golden brown and cooked through.
This process, while detailed, involves minimal active work. The key to the "1-hour" timeline lies in optimizing those proofing stages with a warm environment and highly active yeast, making these homemade hamburger buns a surprisingly quick and rewarding project.
Mastering the Art of Dough: Tips for Perfect Buns Every Time
Baking perfectly soft, fluffy, and shapely homemade hamburger buns is an art, but one that’s easily mastered with a few crucial insights:
Yeast Vigilance: The Lifeblood of Your Buns
- Check Expiry Dates: Expired yeast is the number one culprit for flat, dense bread. Always double-check the date.
- Storage Matters: Yeast sachets are great for single-use, preserving freshness. If using larger jars, store them in the freezer once opened. The cold keeps the yeast dormant, significantly extending its shelf life.
- Test for Activity (Even Instant!): While instant yeast doesn't *require* activation, it's a great habit to add it to your warm liquid (milk or water) first. If it foams and gets bubbly after 5-10 minutes, you know your yeast is alive and ready to work wonders. If it doesn't, discard and start with fresh yeast. For active dry yeast, this activation step is mandatory.
Proofing Prowess: Size and Feel Over Time
- Temperature is Key: Yeast activity is highly dependent on temperature. A warm kitchen (around 75-80°F / 24-27°C) will significantly speed up proofing compared to a cold one. In colder months, seek out warmer spots like near a sunny window, in a slightly warmed (but off!) oven, or even on top of a refrigerator.
- Avoid Overproofing: This is critical. While underproofed dough will result in dense buns, overproofed dough is equally problematic. When dough overproofs, the gluten structure relaxes too much, and the gases escape, causing the buns to collapse dramatically in the oven, leading to deflated, chewy, and doughy results.
- The "Poke Test": Your Best Friend: Forget strict timings; trust the dough. For perfectly proofed buns, gently poke the side of a bun with a floured finger:
- If it springs back immediately without leaving a dent, it needs more proofing time.
- If it slowly bounces back, leaving a small, lasting indentation, it's perfectly proofed and ready for the oven.
- If it leaves a dent that doesn't bounce back at all, your buns are likely overproofed.
Dough Hydration and Shaping Secrets
- Hydration Level: Our recipe typically uses a moderately high hydration (around 66%), which contributes to that desirable soft, pillowy texture. This means the dough will be slightly tacky to the touch. Embrace the tackiness – it's a sign of a well-hydrated dough.
- Adjusting for Humidity: If your dough feels excessively sticky, it might be due to high humidity. Add flour, one tablespoon at a time, until the dough is manageable but still soft and slightly tacky.
- The Shaping Trick: To achieve beautifully round, smooth buns with good structure, avoid rolling the dough between your palms. Instead, place a piece of dough on a lightly floured or clean, un-floured surface. Cup your hand around the dough, with your pinky-side touching the surface. Apply gentle, even pressure as you move your hand in a circular motion. This technique creates surface tension, drawing the dough into a tight ball with a sealed bottom, ensuring a smooth top and preventing tearing during baking.
Elevate Your Burger: Serving Suggestions & Customization
Once you've mastered these homemade hamburger buns, the possibilities are endless! They're not just for beef burgers. Imagine them cradling:
- Smoked pulled pork with tangy coleslaw.
- Crispy fried chicken sandwiches with pickles and a spicy mayo.
- Hearty veggie burgers with all the fixings.
- Juicy grilled salmon patties with a dill sauce.
Don't stop at sesame seeds! Customize your buns with:
- Poppy Seeds: For a different texture and look.
- "Everything Bagel" Seasoning: A savory explosion of garlic, onion, and various seeds.
- Herbs: Incorporate dried herbs like a teaspoon of dried rosemary or oregano into the dough for an aromatic twist.
- Different Washes: Instead of plain egg wash, try an egg wash mixed with a splash of milk or water for a less shiny but equally golden crust.
Storage Tips: Freshly baked buns are best enjoyed the day they're made. However, they can be stored in an airtight container at room temperature for 2-3 days. For longer storage, freeze cooled buns in an airtight bag for up to 2-3 months. Thaw at room temperature or warm gently in a preheated oven for that "fresh out of the oven" experience.
Conclusion
Baking homemade hamburger buns might seem like an extra step in your burger routine, but it's a game-changer that yields immense rewards. The freshness, the incredible flavor, the perfect texture, and the sheer satisfaction of creating something so delicious from scratch far outweigh the minimal effort. With our 1-hour yeast-to-oven guide and these expert tips, you're now equipped to elevate every burger to an unforgettable culinary experience. So, roll up your sleeves, activate that yeast, and prepare to impress yourself and everyone at your table with the best hamburger buns they've ever tasted!
